Intro
Previously on our Web Testing Series
In our previous chapter, we learnt how to test basic scenarios on the web using these three powerful techniques.
- Finding Elements →
browser.element.find() - Interacting with Elements →
.click()and.sendKeys() - Asserting Elements →
.getText().assert.contains()
Overview of this Post
Today we will learn some advanced techniques and use cases in web testing. This will also help you understand the extensive capabilities of what Nightwatch can do. We will expose you to the following scenarios and concepts.
Concepts:
- Test Hooks
- Keyboard Shortcuts & Clipboard
- OS & Browser Info
- Executing client JS
- Actions API
- iFrame
- Async/Await
- Multi-tab Interaction
- Emulating geolocation
For the following tests, you can run them individually after writing each of them or run them all together at the end. You can also use this post as a reference to come back when you're facing similar scenarios.
Complex Scenarios & Concepts
🪝 Test Hooks
Test hooks are special functions that allow developers to perform specific actions at different stages of the test execution process. In our home.spec.js test, we always want to go to the homepage of our nightwatch website. Instead of writing browser.navigateTo('/') in every test, we can add it under a beforeEach hook that will get executed before each test is run. We can also close the browser after every test with browser.end().
describe('Nighwatch homepage', function() {
  beforeEach(browser => browser.window.maximize().navigateTo('/'))
  afterEach(browser => browser.end())
  ...
})
If you want to execute something before or after initiating the tests from a file (home.spec.js), you can do so using before and after hooks. You can also perform an operation before starting or just before exiting the test runner using Global Hooks.
.window.maximize() maximizes our browser window to the screen size.📎 Keyboard Shortcuts & Clipboard
We learnt how to simulate key press using .sendKeys() in our previous post, so shortcuts, including copy and paste, should be fairly straightforward. Pressing CONTROL or COMMAND or SHIFT will hold that key until Keys.NULL is pressed, which will release all the held keys. But the clipboard isn't directly accessible for us to test. We check the clipboard's contents by pasting it on an input element using the keyboard shortcut (⌘ + v / Ctrl + v) and checking the value attribute of the input. Let's test the following scenario,
Click the copy button on the home page and verify if the text is copied.
it('Should copy the installation command on copy button click', function (browser) {
  browser.element.findByText('Copy').click()
  browser.element.find('#docsearch').click()
  const $inputEl = browser.element.find('.DocSearch-Modal .DocSearch-Form input')
  $inputEl.sendKeys([browser.Keys.COMMAND, 'v'])
  $inputEl.getAttribute('value').assert.contains('npm init nightwatch')
})
If we're running the tests on Windows or Linux, we need to replace browser.Keys.COMMAND with browser.Keys.CONTROL. This brings us to the next topic.
🌐 OS & Browser Info
We can find the details about the browser and the platform the test is running in from the browser.capabilities object. These three are the most commonly used – .platformName, .browserName and .browserVersion. We can use this for the previous example and rewrite our test to run on multiple platforms.
const is_mac = browser.capabilities.platformName.toLowerCase().includes('mac')
...
$inputEl.sendKeys([is_mac ? browser.Keys.COMMAND : browser.Keys.CONTROL, 'v'])
🤝 Executing client JS
Next, we'll try to execute some JS in the browser client. This can be done in Nightwatch using executeScript or executeAsyncScript function.
.executeScript(<script>, [...<data>], <optional-return-function>) The
<script> argument can be a string "window.location.reload()" or a function function (...<args>) {...} The arguments
...<args> of the script function will be the [...<data>] sent. The
<optional-return-function> will have the return of the client script as an argument.Execute a client script to increase the size of the logo and change the text of the "Get Started" button to "{Client Side Execution}". Try finding the button with the new text and click it.
it('Should should change with client script', async function (browser) {
  const change_text = "{Client Side Execution}"
  browser.executeScript(function (new_text) {
    const $hero_cta = document.querySelector('.hero__action-button--get-started')
    $hero_cta.innerHTML = new_text
    $hero_cta.style.background = '#ff7f2b'
    document.querySelector('header .navigation-list').style.display = 'none'
    document.querySelector('header .navigation__logo').style.width = '900px'
  }, [change_text])
  browser.pause(1000) // Pausing just to notice the changes
  browser.element.findByText(change_text).click()
  browser.assert.titleMatches('Getting Started')
})
✍ ️Actions API
The Actions API provides granular control over exactly what designated input devices can do. Nightwatch provides an interface for 3 kinds of input sources:
- A key input for keyboard devices
- A pointer input for a mouse, pen or touch devices
- Wheel inputs for scroll wheel devices
This can be done within the existing .perform() command. These are the available actions – .clear(), .click([element]), .contextClick([element]), .doubleClick([element]), .dragAndDrop(from, to), .insert(device, ...actions), .keyDown(key), .keyUp(key), .keyboard(), .mouse(), .move([options]), .pause(duration, ...devices), .press([button]), .release([button]), .sendKeys(...keys) and .synchronize(...devices).
Example:
browser
  .perform(function () {
    const actions = this.actions({ async: true })

    return actions
      .keyDown(Keys.SHIFT)
      .move({ origin: el })
      .press()
      .release()
      .keyUp(Keys.SHIFT)
  })
🖼 iFrame
One of the trickiest aspects of the web is iFrame. These embedded iFrames render a completely different webpage and have their own browsing context and document, allowing for a new non-inherited web page inside yours. Nightwatch has a way to switch to these documents using the .frame() method.
.frame(<identifier>) and the
<identifier> can be any of the following- id: The id attribute of the iframe we're targeting
- number: The position of the iframe in the document, starting with
0-
null: Used to switch to the original browser windowEnter the email and click subscribe inside an iframe.
it('Should allow for substack subscription', function (browser) {
  const iframe_selector = '.footer__wrapper-inner-social-subscribe iframe'
  browser
    .executeScript(function (iframe_selector) {
      document.querySelector(iframe_selector).scrollIntoView()
    }, [iframe_selector])
  browser.element.find(iframe_selector).setAttribute('id', 'test-nightwatch-123')
  browser.frame('test-nightwatch-123')

  browser.element.find('input[type=email]').sendKeys('test@nightwatchjs.org')
  browser.element.find('button[type=submit]').click()

  browser.ensure.alertIsPresent()
  browser.alerts.accept()
  browser.element.findByText('Sign out').assert.present()
})We execute a client script to scroll to the bottom of the page as the iframe we want to interact with is lazy loaded. This scroll to the bottom can also be achieved using the Actions API as follows.
browser
  .perform(function() {
    return this.actions().move({
      origin: browser.element.find(iframe_selector),
    })
  })
🚦 (Not) Using Async/Await
Javascript is a language built around the asynchronous nature of User Interfaces. This was a pain for developers, and to control the order of execution of our code, we started using callbacks. But soon, we ended up in callback hell, and we hated it. Then the beauty of Promises was introduced, and soon in ES7, we got a syntax sugar for it called async/await.
When writing our tests in Javascript, one often comes across the same issue, "Why isn't this code executing" or "This line isn't supposed to execute at this time". We at Nightwatch cared a lot about solving this issue with programming in Javascript. We implemented an async command queue behind the scenes, so you, as a tester, don't have to worry about it.
Nightwatch has internal command queue, so you don't have to worry about the async issues of Javascript
But on the rare occasion that you're taking a value out of Nightwatch API and using it in a vanilla Javascript, then async and await becomes essential. While testing, this is very unlikely, but if you do face such a situation, you can use await to get the value out since every Nightwatch API returns a Promise.
Example:
it('Use values from the webpage', async function(browser) {
  const href = await browser.element.find('.navigation-list li a').getAttribute('href').value
  // You can do anything with the href value here after
  console.log(href)
  MyAPI.track(href)
})
🗂 Multi-tab Interaction
One of the scenarios we commonly come across during browsing is clicking a link that opens in a new tab. Nightwatch allows you to test this scenario by giving you an API to switch between different open documents.
Click on the GitHub icon and check the URL of the new tab opened.
it('Should lead to the GitHub repo on clicking the Github icon', async function (browser) {
  browser.element.find('ul.navigation-list.social li:nth-child(2) a').click()
  // wait until window handle for the new window is available
  browser.waitUntil(async function () {
    const windowHandles = await browser.window.getAllHandles()
    return windowHandles.length === 2
  })

  const allWindows = await browser.window.getAllHandles()
  browser.window.switchTo(allWindows[1])

  browser.assert.urlContains('github.com/nightwatchjs')
})
Every tab is considered a window by the browser. We have a different window object in each of them, after all. Here we wait for the new tab to be available, switch to the new tab, and check if the browser URL matches our GitHub repo URL.
.waitUntil(<condition>) waits for a condition to evaluate to a "truthy" value and fails if it doesn't. The
<condition> maybe any function that returns the value or a Promise to wait for..window.getAllHandles() returns the id array of all the windows.window.switchTo(<id>) takes a window id and switches the test runner to that window🌍 Emulating geolocation
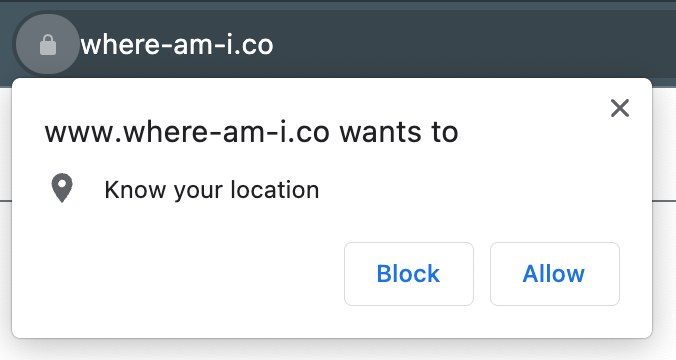
When your website or web app is changing based on the location from which it is being accessed, it becomes important to test your website for all these locations. With the introduction of Chrome DevTools Protocol, Nightwatch supports mocking the geolocation of the browser during the test run with just one command.
Check the address from 3 different locations on the globe.
it('sets and verifies the geolocation to Japan, USA and Denmark', function (browser) {
  const location_tests = [
    {
      location: { latitude: 35.689487, longitude: 139.691706, accuracy: 100 },
      // Tokyo Metropolitan Government Office, 都庁通り, Nishi - Shinjuku 2 - chome, Shinjuku, 163 - 8001, Japan
      test_text: 'Japan',
    },
    {
      location: { latitude: 40.730610, longitude: -73.935242, accuracy: 100 },
      // 38-20 Review Avenue, New York, NY 11101, United States of America
      test_text: 'New York',
    },
    {
      location: { latitude: 55.676098, longitude: 12.568337, accuracy: 100 },
      // unnamed road, 1550 København V, Denmark
      test_text: 'Denmark',
    }
  ]

  const waitTillLoad = async function () {
    const geo_dom_class = await browser.element.find('#geolocation_address')
      .getAttribute('class').value
    return !geo_dom_class.includes('text-muted')
  }

  location_tests.forEach(obj => {
    browser.setGeolocation(obj.location).navigateTo('https://www.where-am-i.co/')
    browser.waitUntil(waitTillLoad)
    browser.element.find('#geolocation_address').getText().assert.contains(obj.test_text)
  })
})
Explanation:
We go through each location in the location_tests array and set the browser to that geolocation. Then wait for the address to be loaded using .waitUntil(fn) by checking if the text-muted class has disappeared. Then we verify if the address has the right text.
.setGeolocation({ latitude, longitude, accuracy }) sets the geolocation of the browser to the given latitude, longitude, and accuracy while mocking the geolocation.For the test to work, you should first visit www.where-am-i.co and allow the website to access your location.
Don't worry. You could always reset the permission for the location after the testing is done.
Coming up Next
Writing scalable tests with Page Object Model
Today you learnt a lot about how to do in-depth testing of websites and web apps to simulate complex use cases and scenarios using Nightwatch. In the next chapter of our series on web testing, we will explore test writing patterns and introduce you to Page Object Model (POM). We’ll go through different patterns that improve the structure and maintainability of your test code, and you’ll learn how to implement the POM – a design pattern promoting reusability and modularity in your test scripts.
Join Our Community 💬
If you have any questions, don't hesitate to visit our Discord server and say hello. Our community is always available to provide support, share insights, and assist you with any testing-related inquiries you may have. We welcome your active participation and look forward to connecting with you in our Discord community. You can also reach out to us via Twitter.
Happy testing! 🎉